

Wednesday, December 29, 2010
Utilising Unused Space in Blogger Header
This is an interesting question from a Blog reader - Jamie. Jamie wants to know if there is way to utilize the unused space in Blogger header. The answer is yes. When you use an image in your header, your image will be aligned to the left. Some of you would want the image to be centered and you'd settle for that. But if you want your image to stay where it is (left), and add a gadget at the unused space on the right side, wouldn't that be cool?

Monday, December 27, 2010
Blogger New Year Banner
Not long ago, I did a tutorial on how you can add a Christmas banner to your blog to convey your Christmas wishes to your readers. Well, Christmas is technically over, so let's prepare for New Year now. This tutorial is similar to the Christmas one, but I figured no one will be looking for it anymore, so here's another one.


Friday, December 24, 2010
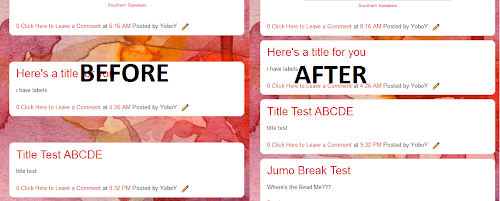
Highlight Blogger Author Comments
It has been awhile. This time, I'm going to show you a quick and easy way to make your comments (author comments) look different. In a thread full of comments, one might feel the need to isolate the author's comments from readers' comments, probably by highlighting it or making it look different.

This tweak works with both Layout (Minima, Harbor, Denim, Rounders, etc) and Designer (Simple, Picture Window, Awesome Inc, etc) templates. Basically, it'll work with all Blogger 'built-in' templates, probably third party templates as well. Consider this my Christmas gift.

UPDATE: THIS TWEAK WILL NOT WORK WITH THE NEW BLOGGER REPLY COMMENT SYSTEM. CLICK ON 'REVERT WIDGET TEMPLATES TO DEFAULT' TO UNDO THIS TWEAK. I'VE PUBLISHED A NEW WAY OF HIGHLIGHTING AUTHOR COMMENTS FOR THE NEW THREADED SYSTEM, CHECK IT OUT.
This tweak works with both Layout (Minima, Harbor, Denim, Rounders, etc) and Designer (Simple, Picture Window, Awesome Inc, etc) templates. Basically, it'll work with all Blogger 'built-in' templates, probably third party templates as well. Consider this my Christmas gift.
Thursday, December 16, 2010
Blogger Christmas Banner
It's that time of the year again. What better way is there to wish your readers a Merry Christmas than to place a Christmas banner in your blog? This is a request from a blog reader (KitchenMorph). I thought it was a good idea, so I decided to write a tutorial on it.

Add one now to your blog in 1 easy step!

Add one now to your blog in 1 easy step!
Wednesday, December 15, 2010
Adding Syntaxhighlighter to Blogger
Sorry for the lack of updates for the past few days. I have been really tied up with some stuffs, and it will remain like this for the next few days. I'll try to make this one quick and simple. This is a request from a blog reader (RainDropSoup). In this tutorial, I will share with you guys how I added my Syntaxhighlighter. Syntaxhighlighter is an add-on that can be added to Blogger (and other websites). It makes your code snippet looks pretty. Here's an example:
Pretty, ain't it?Usually, Bloggers that post programming codes would want to add this one to their blogs, as it makes everything easier and tidy. You can still use this add-on to post normal texts, if you want your text to stand out from the rest of your contents. There are lots and lots of tutorials out there that teach you how to add it to Blogger. When I first added it, I tried some of these tutorials myself, and not all of them work. So, here's how I added it.
Sunday, December 12, 2010
Google Translator Blogger Widget
You might have noticed the drop-down menu at the top-left section of my page. With this widget, I let my readers translate this site to over 50 languages without sending them to other websites, thanks to Google Translator. The Official Google Translator widget allows your reader to quickly and automatically view your page in a different language. In this quick tutorial, I'm gonna show you how you can add this Official Google Translator widget to your blog.


Saturday, December 11, 2010
Repositioning Blogger Title and Description
As per request from a blog reader (Leigh), here's a tutorial on how you can reposition your Blogger's title and description. This is a short and quick one.


Thursday, December 9, 2010
Centering Blogger Picture Gadget Image
Here's a quick one. For some odd reasons, the developers of Blogger's Picture gadget did not feel the need to center the images when they are added. This gives an awkward look, depending on where your pictures are aligned. In some templates, it works fine (I can't remember which). For those of you who want to center your picture gadget's images, here's how.
 |
| Before |
 |
| After |
Monday, December 6, 2010
Enlarging Blogger Profile Image
By default, Blogger displays your profile image at 80x80 pixels. That's small, and some users want their profile images to be larger than this. In this tutorial, I will show you how you can quickly make your profile image bigger.


Changing Blogger Title Link
In my previous post, I have showed you how you can change your Blogger header image's link. But in order to do this, you'd have to disable your blog's title. Some might not like the idea of having their titles removed just to make way for some links in their headers. Well, you don't have to remove your title to include a link in your header, as you already have your title linked. When you are not on your main page, your blog's title will be automatically linked, to itself of course. In this tutorial, you will learn how you can change this link to point elsewhere. And best of all, this link will appear on the main page itself. I have also added a quick step on how you can get your description linked as well.


Sunday, December 5, 2010
Changing Blogger Header Image Link
If you choose to either place your header image 'Instead of title and description' or 'Have description placed after the image' while uploading your header image to Blogger, your image will have a link on it. The link acts like a home button, as it brings you to your main page. However, some prefer to have it pointing elsewhere, to a private website for example. In this tutorial, I will show how you can quickly change the target destination of this link.


Saturday, December 4, 2010
Getting the Best Responses from Blogger Help Forum
http://www.southernspeakers.net/2010/12/getting-best-responses-from-blogger.html
Blogger Help Forum is a place where you can shoot your various Blogger-related questions, and kind helpers will help you out to resolve issues that you are facing. However, many questions are still left unanswered - and one can hardly blame the helpers for this. As an asker, it is your responsibility to make sure your questions get attended. If your question is not answered, you have yourself to blame. Either that or no-one knows the answer to your question. In this post, I will list out as many tips that I can think of to help you get the best possible responses from the helpers at Blogger Help Forum.

Blogger Help Forum is a place where you can shoot your various Blogger-related questions, and kind helpers will help you out to resolve issues that you are facing. However, many questions are still left unanswered - and one can hardly blame the helpers for this. As an asker, it is your responsibility to make sure your questions get attended. If your question is not answered, you have yourself to blame. Either that or no-one knows the answer to your question. In this post, I will list out as many tips that I can think of to help you get the best possible responses from the helpers at Blogger Help Forum.

Thursday, December 2, 2010
Adding a Third Party Gadget
This one is for beginners. Advanced users, please ignore this post. Lot's of users are having trouble in placing third party widgets. You can't blame them, Blogger is not user friendly when it comes to this. To add a third party gadget, you ought to use the HTML/Javascript gadget. But this is not readily known. If I were a non-technical person, I wouldn't have any idea what a HTML/Javascript gadget is. In Blogger Help Forum, I have captured dozens of screen shots to pin-point exactly where the HTML/Javacript gadget is. With this post, I hope I won't be capturing anymore screenshots.


Show Date for Each Blogger Post
I tried to figure this one out a long time ago but I had no luck back then. Today I've found a way. When you publish more than a post for a given day, only the most recent post (last post) will have it's date shown. Moreover, certain templates (like Awesome Inc) make it worse by grouping all these posts together as though they are all one single post. Although it makes sense to group posts published on the same day under a single category, lot's of users prefer to have the date shown on each post separately.


UPDATE:
I've improvised this tutorial by adding some Javascript. The timestamp does not have to be sacrificed anymore. Check out the new improvised tutorial below:
Wednesday, December 1, 2010
Adding Buttons to Blogger Header
It isn't possible to directly add a button to your header. There isn't such feature in Blogger. But there's a workaround. Using CSS 'position' and 'z-index' attributes, you can place an image (button) on top of your header and make it clickable. Check out a live demo here:

Tuesday, November 30, 2010
When Nature Pays A Visit
 |  |
What will you do when nature pays a visit, with guests like praying mantis and Attacus Atlas? Take the forsaken camera and snap the lens out of it.Unbelievably I was bewildered by this sudden visit from these critters which is rather amusingly weird. I mean I'm staying in an apartment which is basically located in a rather developed area, so this uncanny approach from nature’s guest is awesome.
Saturday, November 27, 2010
Blogger Floating Footer
Have you ever seen a toolbar or a footer that kinda floats on your screen and remains there even when you scroll around the page? For example, like this one I have here in my test blog:

This one is real easy to do. In this tutorial, you will learn how to float your footer. I have used Awesome Inc template since it comes with a nice footer on its own. So I just had to modify it a little. I wont be discussing on how you can decorate your footer before floating it. That is totally up to you. You can place an image, text, widget, attribute or anything there, that's irrelevant to this tutorial. So, go to Template Designer or look for some tutorials on how you can do that first. When you have a satisfactory footer, come back here and see how you can make it float in one easy step!
This one is real easy to do. In this tutorial, you will learn how to float your footer. I have used Awesome Inc template since it comes with a nice footer on its own. So I just had to modify it a little. I wont be discussing on how you can decorate your footer before floating it. That is totally up to you. You can place an image, text, widget, attribute or anything there, that's irrelevant to this tutorial. So, go to Template Designer or look for some tutorials on how you can do that first. When you have a satisfactory footer, come back here and see how you can make it float in one easy step!
Friday, November 26, 2010
Open Blogger Links in New Tabs
Here's a quick and easy one. For all I know, you might have all kinds of reasons as to why you want to have your links to open in new tabs. If I had to guess, I'd say you want your readers to keep exploring/crawling your blog while always having a chance of going back to the the referring page (where they came from).
You have a higher chance of keeping your readers in your blog if your blog pages are opened in multiple tabs. If all your links open in a single tab, how many of your readers will actually hit the 'back' button to go back to your main page and check your other posts and links? When you make your links open in a new tab, you force your readers to somehow go back to your main page.

All reasons aside, here's how you can do it.
Thursday, November 25, 2010
IDs and Classes for Beginners
Initially, I wrote this on another tutorial. But I think it is generic enough to be on its own post. This is a non-technical explanation about IDs and classes made execlusively for beginners. Here I am copying and pasting what I wrote on one of my other posts.


Remove Space between Blogger Posts
I have just written a tutorial on how you can reduce space between Blogger gadgets. I guess I might as well write a tutorial on this one, since you have to address the elements in this one in a slightly different manner. How different one might ask. Most gadgets are unique, so normally they have their own IDs. However, it is difficult to find an ID for your post structures since post structures are identified using classes. Please refer to this post on a brief note about IDs and Classes.

Remove Space between Gadgets in Blogger Sidebar
Here's a popular question: "How do I remove spaces between gadgets on my sidebar?" I have seen this question being asked many times that I think a proper straight-forward tutorial is needed for this matter for future references. One might want to remove spaces between gadgets for various reasons. A common one is to use a picture gadget as a title, so the picture gadget needs to be really close with the next gadget to serve as a title. If you're interested in reducing space between your blog posts, see this tutorial instead.


Wednesday, November 24, 2010
We Have Gone to SouthernSpeakers.net
SouthernSpeakers has gone custom-domain! You can access this blog at southernspeakers.net now. You don't have to update your existing bookmarks/feeds as you will be automatically redirected to this new domain. At first, Internet Explorer showed a white background instead of a black one when other browsers were okay with the transition. Funny how a browser can act differently when it comes to handling a simple redirection. Must be something to do with its 'advanced state-of-the-art' renderer. But it's nothing a simple CSS code won't fix. A strong !important attribute made this blog stays black in all browsers. If you notice any problems at all, do notify me.
By the way, I have lots of tutorials coming on. If you have anything in mind that you think is possible to be achieved but you're not sure how to do it, please leave a comment anywhere in this blog and I will try my best to write a tutorial for it. Thanks for dropping by.
By the way, I have lots of tutorials coming on. If you have anything in mind that you think is possible to be achieved but you're not sure how to do it, please leave a comment anywhere in this blog and I will try my best to write a tutorial for it. Thanks for dropping by.
Sunday, November 21, 2010
Resize Blogger Post Image
I have been wanting to write a post on this for quite some time now. I have written a tutorial on how you can control the target size of an image when you click on it. This tutorial uses the same idea. When you upload an image to Blogger, you can resize them by clicking on the image once. But you are only allowed to choose between Small, Medium, Large, Extra Large and Original sizes. What if you want a custom size that is not defined by any of these selectable sizes? Sometimes, you have to make your post images really small to line up few images in a line.
You can easily adjust the size of your image to fit whatever size that you want it to be. See this image for example. I have adjusted the size of this image to fit the width of my main posting area, with some room to breathe at either sides of the image.

You can easily adjust the size of your image to fit whatever size that you want it to be. See this image for example. I have adjusted the size of this image to fit the width of my main posting area, with some room to breathe at either sides of the image.

Saturday, November 20, 2010
Remove Blogger Static Page Titles
When you click on a Pages Gadget link to view your static page, there will be two title texts on the same page. One is the default static page title, and another one is the link from your Pages gadget. It looks ugly, and many users would want this page titles to be removed.


Friday, November 19, 2010
Upload Multiple Pictures with Blogger's Updated Editor
This might be an old news for many of you, but there are plenty of users out there who are not aware that Blogger allows you to upload multiple pictures at one go with its Updated Editor. I have uploaded 98+ images at one time, so I am not really sure what's the maximum number of images that you can upload at a single go. In this tutorial, you will learn how to switch to the Updated Editor, and upload multiple pictures at a single go. So this is not a tweak, more like a walkthrough.
Reposition Blogger Header Image
Previously I have written a tutorial on how you can resize your Blogger's header image. Here's the sequel to that tutorial, how to reposition your Blogger header image. As usual, there isn't a straight forward method to align/reposition Blogger's header image. Most users would want their images to be in the center, and some prefer either on the left or the right depending to the layout of their templates. It goes without saying that there are more than one way in which you can do this. In this tutorial, you will learn how to place your header at an exact location of your choice.
Monday, November 15, 2010
Add Border in Blogger Posts
I have recently added border in all of my tutorial posts to isolate the different steps involved. This gives me the advantage of creating a sub-post-like content. Not only it improves the readability of my blog, it actually adds a little bit to the cosmetic aspect too.You might want to add borders in your posts (emphasize on 'in', as opposed to 'around') for various reasons. You can style it however you want, by giving it different colors, sizes, and styles. Here's an example of what you will achieve at the end of this tutorial.
I've added a border around this portion of my post to isolate this content from my other contents.
It does look good too, and it is extremely simply to add!
Sunday, November 14, 2010
Beware of Phishing Emails
Just a moment ago, I received this email from some A-Hole. It looks so convincing as if it has been sent by the Google team itself. This is what the email says:
For optimum service from Gmail and ensured security, your Google product needs to be verified.
Verify
Please keep this email for your records, as it contains an important verification code that you may need should you ever encounter problems or forget your password.
The Gmail Team.
Verification code: 4afdae6a-4011e5b1-8daf8de186
Verify
Please keep this email for your records, as it contains an important verification code that you may need should you ever encounter problems or forget your password.
The Gmail Team.
Verification code: 4afdae6a-4011e5b1-8daf8de186
Make Blogger Posts Open in New Tabs
By default, when you click on a post's link, the post page will load on the current tab/window itself. There are lots of reasons on why you might want your posts to open in new tabs. I won't be discussing what these reasons are (because currently my idle mind can't think of any!), I'm just gonna cut to the chase and show you how.
In this tutorial, I will be using Simple Template by Josh Peterson. It should work with other templates as well, but I can't guarantee on those heavily moded ones. The method remains the same though. If you can grasp the idea, you can apply this simple tweak to your template as well no matter how different it is.
In this tutorial, I will be using Simple Template by Josh Peterson. It should work with other templates as well, but I can't guarantee on those heavily moded ones. The method remains the same though. If you can grasp the idea, you can apply this simple tweak to your template as well no matter how different it is.
Saturday, November 13, 2010
Resize Blogger Header Image
Blogger does not provide you an easy way to resize your header image. Imagine how troublesome it is to get your image's dimensions to be perfect before you can actually upload it to Blogger. But usually we face a less-than-ideal case. So we'll be left with only one option, to resize our original image and then re-upload them.
In this tutorial, I will share with you 2 methods on how you can resize your image directly by tweaking some code without having to resize your original image and reupload this image to Blogger. Of course, you can always opt to resize your image (using MS Paint, Photoshop or online image resizing websites like http://www.resizeyourimage.com/) and then reupload your image to Blogger. But it's always more convenient to just change a number or two and see an instant change in your header's image.
UPDATE: If you're a beginner, check this link out instead.
Friday, November 12, 2010
Identify Blogger Gadget ID
Identifying Blogger's gadget (or element) ID is important when it comes to tweaking your blog. This is because most Blogger tweaks involves CSS styling (emphasize on 'most'). In order for you to style an element using CSS code, you'd have to address that element first. And it will not be possible if you do not know the element's ID or class.
Here comes another question, what is an ID and what is a Class? This question tangential to what is being discussed in this tutorial, but for the sake of simplicity, you'd only have to know that an ID is a unique identifier used to address ONE specific element in a page, whereas a class is an identifier that can be used to address few elements as whole. All 'built-in' gadgets in Blogger can be addressed using IDs. So knowing an element's ID will allow you to apply CSS styling on it. Common tweaks that are applied to these gadgets are margin-reduction, repositioning, resizing and even hiding an element completely from a given page.
In this tutorial, I will share with you two methods on how you can identify your Blogger's elements' IDs. The first one is a straight-forward method, recommended for beginners. The second method is also straight-forward, but you'd have to install an add-on for it. Opt for the second one if you're gonna be finding out your element's IDs or classes frequently.
Tuesday, November 9, 2010
Jump to a Content Anywhere in a Page
Here's another one. Have you ever wondered how to create a jump-to-content action when you click on something from a table of contents? For example, there maybe a list of links named alphabetically from 'A' to 'Z'. When you click on 'Y' for example, your browser will jump to the contents in 'Y', saving you from the trouble of scrolling down all the way towards the bottom of the page. Here's a simple example:
Monday, November 8, 2010
Blogger Margin Fix
When it comes to tweaking your blog, sometimes you will find some of your page elements being shifted away from its original desired position. And most of the times you wouldn't find an easy fix for this. This tends to happen when you are hiding an element from your page. As a result, some gap is resulted at the place where the element was supposed to be, causing a distorted look.

In this tutorial, you will learn a simple trick on how to 'pull' a page element towards a certain direction using CSS code. I wanted to include this tweak in my previous tutorial, when I was writing on how to hide an annoying tag that would appear in label pages. Then again, I thought it'd be better if this tweak has it's own page as well. So here it is.

In this tutorial, you will learn a simple trick on how to 'pull' a page element towards a certain direction using CSS code. I wanted to include this tweak in my previous tutorial, when I was writing on how to hide an annoying tag that would appear in label pages. Then again, I thought it'd be better if this tweak has it's own page as well. So here it is.
Remove "Showing newest posts with label..." Tag
When a label page is loaded, and if this page could not accommodate all of the labeled posts in a sinlge page (where you'd have to click 'Older Posts' to see previous posts), you'd be greeted with an annoying tag that that reads:

If you are familiar with my previous tutorials, you would have seen a way to remove this tag. But I think this method deserves a dedicated tutorial for itself since it is a famous query when it comes to blog-tweaking.
In this tutorial, you will learn a very simple way to remove this annoying tag. Moreover, you will learn a way to fix the page margin as removing the label tag will create a gap in your page (in certain templates).
"Showing newest posts with label <label>. Show older posts"

If you are familiar with my previous tutorials, you would have seen a way to remove this tag. But I think this method deserves a dedicated tutorial for itself since it is a famous query when it comes to blog-tweaking.
In this tutorial, you will learn a very simple way to remove this annoying tag. Moreover, you will learn a way to fix the page margin as removing the label tag will create a gap in your page (in certain templates).
Wednesday, November 3, 2010
Blogger Thumbnail Gallery
I have been wanting to post a tutorial on this for quite some time now. In this tutorial, you will learn how to arrange images in a thumbnail-gallery-like-format. That means, your images will be close to each other, making a 2x2 or any other dimension that you define. Here's an example of what you will achieve:
 |  |
 |  |
Sunday, October 31, 2010
Show/Hide Gadgets on a Specific Page
It's about time to write a general tutorial on how to do this. I have written few tutorials in the past that use this concept, but it was specifically made for the Archive gadget and so on. But the need to generalize this concept is there, so here it comes!
I am sure there are lots of ways to do this. I'm going to write a tutorial on how I do things.The idea behind this tweak is simple, conditional codes. But it is very important for you to know which element you want to apply the conditions on. Check out this brief tutorial first on how you can identify your elements' ID or Classes. To examine the element, I excessively use Firebug. Firebug is a useful Firefox add-on that allows you to examine CSS styling of a certain page element before you style it. As I said before, this is my way of doing it. I know you can find the way to address your page elements by going to your template and usually find it in the widget area, but Firebug saves a lot of time.
So let's get started. In this tutorial, I will apply a text gadget below my header. So by default, this gadget will appear on every single page. But I want it to appear only on the homepage, so here's how.
Image Too Large When Clicked On
This is a very common modification that blogger would like to make but has no direct solution to it. Here's the problem. You have a cool camera, and you want to upload pictures that you have snapped to your blog. But when you have done this, the target image when it is clicked on appears to be very big, huge!
There are two ways to work around this issue. The first one is the obvious and tedious one, to resize your image before you upload to your blog. There are hundreds of online websites where you can resize your pictures. Alternatively, you can use software like Windows built-in MS Paint or Adobe's Photoshop to resize your image. You can even download third party software to resize your image in a batch.
But that is not what this post is about. In this quick tutorial, I am going to teach you how to resize your target image without going through the hassle of resizing your image before uploading. You can simply 'tell' (with machine language of course, but not literally 'machine language') blogger to show your image at a different size. And it's rather easy and flexible, as you can change to a different size whenever you change your mind without having to upload your image all over again.
Wednesday, October 27, 2010
RIP Paul the Psychic Octopus

Diego Maradona: "I am happy you're gone Psychic Octopus, it's your fault we lost the World Cup,"
Image from http://www.inewscatcher.com
Images Can't Be Clicked After Adding Captions
Update: The bug has been fixed.
This is a bug that still exists in the new editor. It is yet to be fixed. In the updated editor, when a caption is added to an image using the 'Add Caption' feature, the image will not be clickable, or linked. The bug is so obvious with the way it is coded. Few lines are misplaced. There's a quick fix to this, rearrange three lines from the image's HTML.
Check out the following two images. Both of them have captions added. The first one is the default setting, without the fix, so the image is not clickable. The second one has the fix applied, so it is clickable.
Tuesday, October 26, 2010
Publish Post in Blogger Static Pages
Well, not exactly. You can't publish a dynamic post in a static page. But you can make it appear so, by labeling your posts and linking your label to your tab menu. That's what this tutorial is about. If you want a demo, feel free to click on the Places, Review, Transformers and Photography link on top of this blog, and you will get a live demo of what I've been talking about.
Thursday, October 21, 2010
How to Customize Links and Tabs on Pages Gadget
This is a quick tutorial on how to customize links and tabs on pages gadget, in case you want to have a tab to link to some other URL instead of your static pages alone (how selfish the current limitation is!). Do note that after this hack, you won't be able to edit your pages gadget directly by clicking on 'Edit' on your Pages Gadget from Page Element. You'd have to code it each time you wanna make changes. So if you have added a new static page, it wont automatically show on your Pages Gadget unless you make the necessary changes.
Make sure you have already added your Pages Gadget before attempting this tutorial.
Update: With the new Blogger interface, you can add external links to your Pages gadget.
Make sure you have already added your Pages Gadget before attempting this tutorial.
Update: With the new Blogger interface, you can add external links to your Pages gadget.
Wednesday, October 20, 2010
Different Background on Different Page
If you have read my past few posts, you might have already guessed that I will be using conditional codes heavily in this tutorial. Anyway, you actually have different background on different pages. What you need to achieve this? Well, you must at least know how to change your regular main page background using CSS code. You see, there are many page templates and each of them have different ways to address to something, so you must at least do a little homework and try to change it first on the main page.
You can Checkout my test blog for a sample result. Link tab and Contact tab have different backgrounds:
http://www.test2.southernspeakers.net/
You can Checkout my test blog for a sample result. Link tab and Contact tab have different backgrounds:
http://www.test2.southernspeakers.net/
Monday, October 18, 2010
Adding an Already Added Gadget
In this quick tutorial, I will show you how to add an already added gadget. I am going to use Page Gadget as an example. As you might have guessed, if you have already added Page Gadget (and some other gadgets), you cant add it again for the second time. If for some strange reason you need the same gadget twice, this tutorial is for you.
If you already have a Page Gadget, remove it first before attempting this tutorial.
If you already have a Page Gadget, remove it first before attempting this tutorial.
Customize Tabs on Pages Gadget
This one is a real quicky. In this tutorial, you will learn how to customize the tabs and its links on the Pages gadgets.
Saturday, October 16, 2010
Dedicated Separate Archive Page
This tutorial teaches you how to create a separate archive page, on a static page. That means, you'd be able to see a dedicated static page on your menu, on which you can click on to view your blog's archive. You can choose to display or not to display conventional archive gadget on the sidebar, that's totally up to you. Anyway, you can check out a sample here:
http://www.test2.southernspeakers.net/p/archive.html
The idea behind this tutorial is to place the Archive gadget on all the pages, and then code it in such a way that it will only be visible on one selected static page. Before starting this tutorial, I am going to assume that you already have an Archive Static Page created and optionally Pages Gadget (menu bar) placed below your header.
Virtual Static Page with Selected Posts in it
I realized that this is another common effect that bloggers are trying to achieve but has no direct solution to it. So this tutorial is made especially for you guys. In this tutorial, you will learn how to link to posts sorted by a specific label, and place this link on your Pages Gadget or Menu Bar or Navigation Bar. If you still don't know what I am talking about, imagine a link on your menu bar which you can click on, and this link will bring you to a page similar to your main page, but with only selected posts in it.
Some bloggers are looking ways to achieve this using static pages. Unfortunately, you can't do it using a static page. Blog posts are dynamic, and static pages are static, the two certainly don't mix. However, we can simulate this effect. In this tutorial you will learn how to simulate an effect of having posts in a static page which already have texts or images. So it'd look like a normal static page, but with selected posts on it. And you don't need to waste a static page to do this! From here on, I will be addressing this page as Virtual Static Page.
So, in short, what you will get is a menu which has extra tabs on it, and when you click that tab, you will be brought to a page which has posts that you have specifically selected. In addition, you could also have texts or images there to act like a header of that page. You can check out my test blog here:
http://yoboytestblog.blogspot.com
Blogger Tips: Setting Up Homepage
By default your index page, which is the page that you'd get when you type in a domain, is the page where your main post body is located. Thus, when you visit a blog, you'd see posts in your index page. Whereas in a website, usually an index page is an introductory page, and you'd be able to click a tab from the menu to bring you to the blog/posts page. This is what we are trying to achieve in this tutorial.
Test Blog
In this tutorial, you'd be able to have a homepage, with no posts on it, and you can click on a tab to bring your reader to your posts. On the downside, this method is not so straight forward, and it involves some hardcoding. Something not so suitable for beginners, but feel free to try it out.
Thursday, October 14, 2010
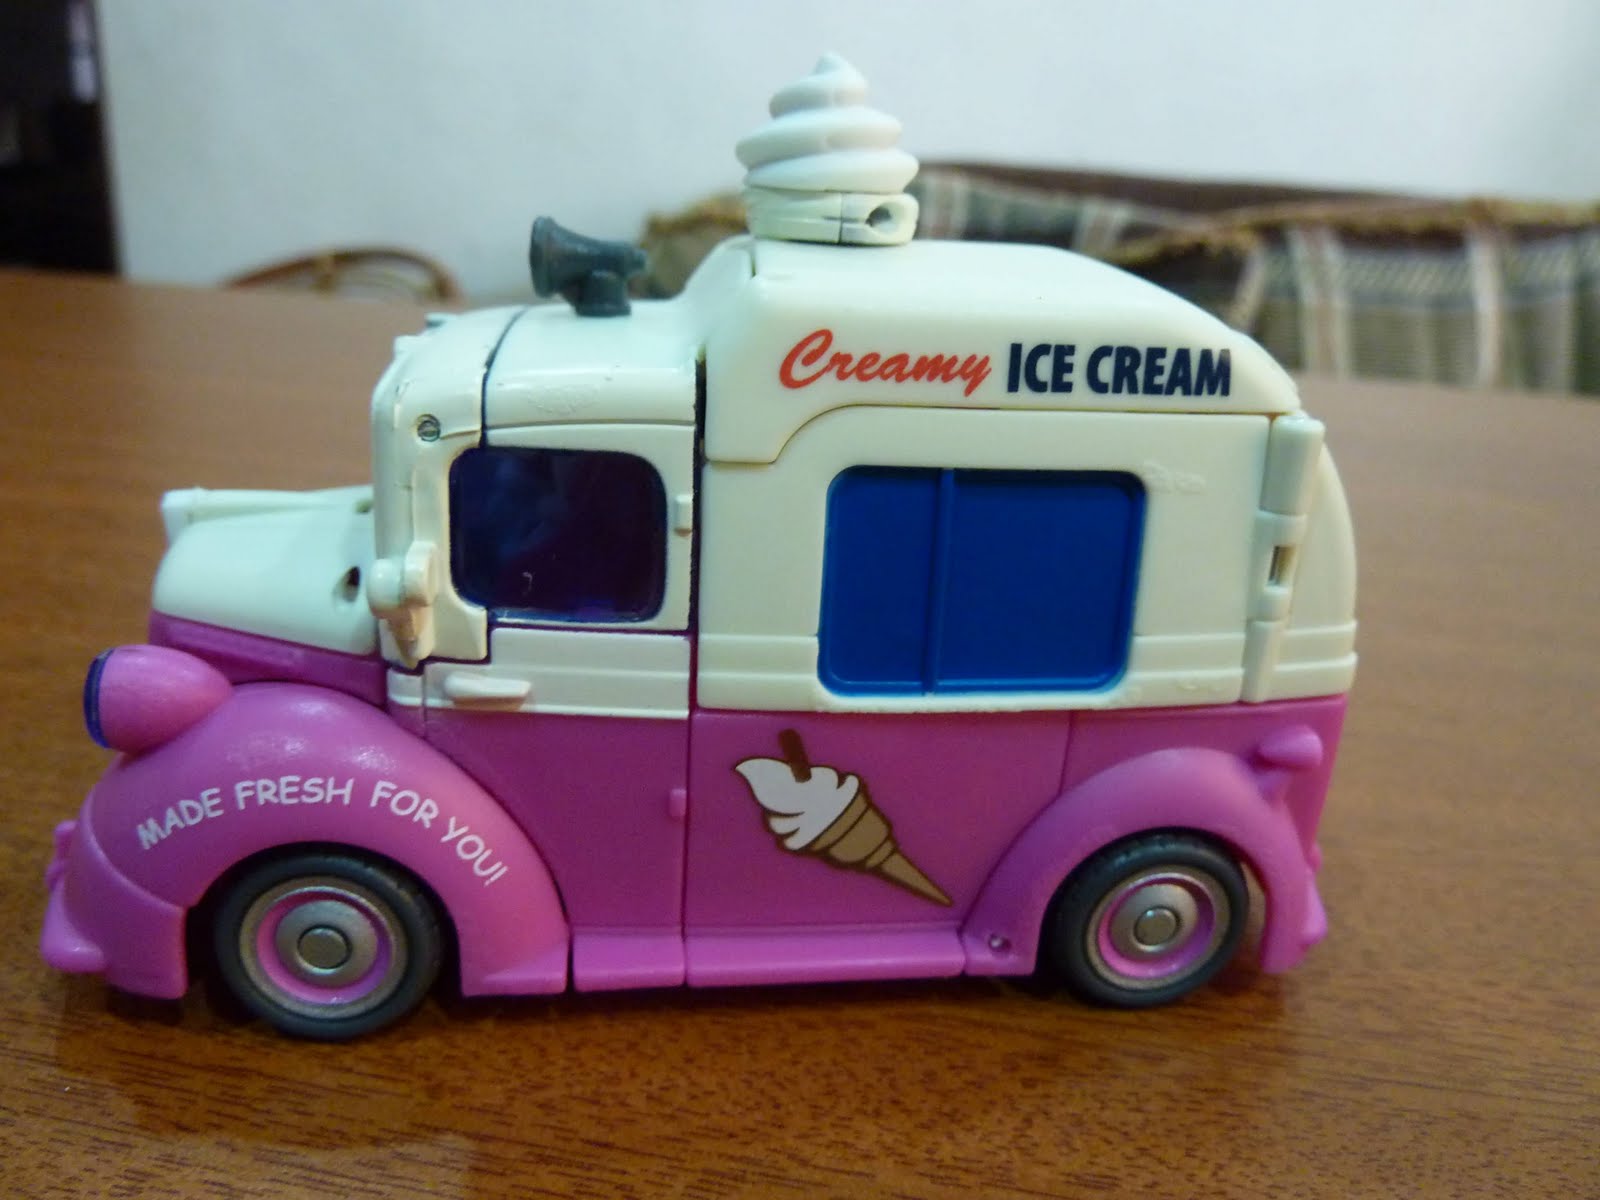
Transformers Leader Class Starscream Review
Another precious gift from my Girlfriend. This time, Transformers Hunt for the Decepticons Leader Class Starscream. A really slow, detailed, step-by-step review made specifically for the beginners. As usual, Robot to Alternative Mode (F22 Raptor Jet) review.
Wednesday, September 1, 2010
Paranormal Activity caught on tape - again
Our camera took another hit again. But things didn't turn out the way we have wanted. We have heard lots of noises from the ceiling lately so we decided to put some powder directly below our attic opening in hope of recording something supernatural. See for yourself what the camera has picked up. Note: We have gone to bed after setting up the camera. When we woke up the next morning, the battery has already drained. It has recorded for almost 3hours +. To ease your viewing experience, I have trimmed the parts which has no activity in it, and fast forwarded some others. You might wanna increase your volume to hear things out.
Tuesday, August 31, 2010
Sunday, August 29, 2010
Sunday, August 22, 2010
Paranormal Activities Caught on Camera at Home!
Nowadays I sleep late. Like 8am late. I know it'd sound stupid when I say this, but I've been hearing lots of funny noises. When these noises are heard, usually everyone else would have long been on bed. Usually I'd blame it on Yuri (our 3-month-old puppy). But recent chains of events have suggested otherwise. So to actually find out what was going on, and to kill some time, I decided to investigate what has been happening. Most of the time, I'd keep my computer room door open and I'd be with the computer, alone in the dark. I'd have clear vision of the living hall, and so far nothing unusual has been sighted. If there were needs for me to go upstairs, I'd set up my camera and then proceed. This has been going on for 2 weeks or so. But what was caught on tape last night was unexplainable, even for me. Never in my life I thought I'd see something real like this. You have to see for yourself to believe. Go ahead and download the video to analyse it if you have to. My advice, better trust in God, these things are real. Mark my words.
Wednesday, August 18, 2010
Tuesday, August 17, 2010
Wednesday, April 21, 2010
Digital Electronic Padlock
You can get my conference paper from the following sites:
IEEE Xplorer Digital Library
ACM Digital Library
CS Digital Library
Multimedia University (free)
IEEE Xplorer Digital Library
ACM Digital Library
CS Digital Library
Multimedia University (free)
Hi guys.. Sorry for the lack of updates.. I've been a lil bit tied up with lots of things.. Mostly due to my Final Year Project. So here it is, Digital Electronic Padlock. This invention has been accepted for conference by the IEEE. I spent the last 1 year or so to design and implement this project. Every phase of this project has been challenging and entertaining. I had to teach myself a small portion of mechanical engineering-related-subjects to achieve completion. And I'm proud it has been completed now.
It is basically a padlock that does not require an analogue key. In return, you'd need a correct password to make the padlock unlock itself. When you enter a correct password, the padlock would unlock itself. Watch the video for a brief demonstration. Oh, did I mention that the padlock is water resistant?
Tuesday, March 9, 2010
The 'Tail' of a Pardoned Gecko
Today, while studying for my final year midterms, I realized that the baby gecko (cicak) I let live last semester has grown up to an adult size. Moreover, it was making annoying sounds. I decided to let it die on its own via natural causes assuming it won't live long. Besides, catching a gecko in this part of my house (my study room) is relatively harder than other places, as my room is extremely messy with books and stuffs. I did a quick search and I learned that an average gecko could live up to 5 years. This gecko gonna outlive my hamsters . FML.
Thursday, January 28, 2010
Types of Hamster Bites
I have been having hamsters for quite some time now. And hamster bites are often underrated. Based on my observations, there are like four levels of hamster bites, as follows:
Kilo Bite - This bite occurs when a hammy do not know if your finger is something edible. So, it'd try to nibble your finger with its teeth. When it gets comfortable enough, it'd go to the next level. This bites normally occur when your fingers smell of food, thus confusing the hammies. These bites are usually harmless and sometimes you might even like it.
Mega Bite - When a hamster is certain that your finger is some kind of food, it'd go ahead and bite you, the same way it'd bite a treat or something. It could bleed at times. Hamsters with poor eye-sight tend to do this, especially the red-eyed ones.
Giga Bite - This is the most common bite of all. When a hamster feels threatened, it would attack you. Note that most of the time the hamster does not wait to find out what is attacking it, so it'd just go all out. Sleeping hamsters or nursing mother hamster tend to do this. Normally it is hurtful and it is almost certain that you'd bleed from this kind of bite.
Tera Bite - The most disastrous and least experienced bite of all time. If you do not agree with me, probably your have not gone to this ultimate stage. Have you ever wondered when two hamsters are fighting and biting each other, how'd it feel? If you think it'd hurt like the above three levels, you are wrong. The pain that hamsters try to inflict on other hamsters during a fight is extra-ordinary. It is very unlikely for a hamster to willingly attack a human with this bite. So, wanna know why is this bite so disastrous? Check out the video below.
Viewer Discretion Is Advised
The reality of the contents of the video largely depends on viewer's imagination capability.
Friday, January 22, 2010
My Lil' Blue Dragon
Meet Bluey, my dragon..
Lol.. Don't judge me, it's so cool that I had to try it myself :P Try one now!
http://www.curiouser.co.uk/illusions/dragon/dragon.jpg
Lol.. Don't judge me, it's so cool that I had to try it myself :P Try one now!
http://www.curiouser.co.uk/illusions/dragon/dragon.jpg
Wednesday, January 20, 2010
Namewee Vs TNB Malaysia
The video is self explanatory. WARNING: Video contains abusive language. Might not be suitable for small kids.
Saturday, January 16, 2010
Melaka Marina Beach
 So, there is a new beach in town - Marina Beach. It used to be some private property but the government (surprisingly) was kind enough to claim and develop it for tourism. Perfect spot for dating and fishing. One can also simply relax there while enjoying the sea breeze from the Straits of Melaka.


My dad showing a fish that I caught to the camera :)
Wednesday, January 13, 2010


Tuesday, January 12, 2010
Random Post
This blog has been all about hamsters and transformers toys reviews lately.. Not what I envisioned for when I signed up for this.. You cant blame me though, there aint nuthin much goin on in my country lately except for some.. erm.. for lack of a better word.. fools, busy fightin for sumtin so trivial in my opinion. Maybe I should rename the blog Southern Rodents or sumtin.. Or Cannibalism in Thailand for that matter.. Speaking of boring stuffs, here's a rare scene at my place..
 A hot air balloon on the Dataran Pahlawan field.. The scene came along with dozens of pathetic couples sitting on the middle of the dark field surrounded by hundreds of blood thirsty mosquitoes while pathetically watching the hot air balloon.. What makes it sadder is the fact that these couples can be found here almost all the time, with or without the balloon..
On a lighter note, here are pictures of Katie's babies. They are 6 days old now :)


Thursday, January 7, 2010
Hammy Updates!!
So, lots of things have happened since I last blogged about them. First of all, Katie gave birth, like y'all know.. But they didnt make it though, none of them did.. Then, Berry gave birth, and the next day, Julie did.. Owh, they are all Mica's not-so-desperate wives by the way.. And then, Julie's babies didnt make it as well.. But Berry, I have to give it to her.. It was unexpected, but she was the mother of the decade!!
So here they are, three new members to the family.. Known as the ABC Twins..
The one that looks like Berry is Amber. And of course there's another that looks like Berry, that is Babyface (previously knows as Baby Gaga, turned out he is a boy).. Then the brown one is, erm, the obvious, Chris Brown :P
So Amber + Babyface + Chris Brown = The ABC Twins
As for Katie, she decided to try again after a disappointing first start - only to come back meaner! She gave birth to 9 or 10 adorable pups this morning! Although Im not sure how many will make it though.. Oh, Panda is the father this time.
As for the others, Julie is living happily ever after with Mica. Redi has became a priest and he lives at the Hamster's Batu Caves in my house, and Panda is a hunk now. He has these six-pack abs and stuffs. And he is a model too. (Refer to the post below.
Wednesday, January 6, 2010
Panda Post!
Initially it was a combined post but there is this glitch with blogspot that doesnt embed youtube videos when Panda's photos are uploaded.. So, what do you know.. enjoy these pictures..
So, Panda is a hunk now. No, seriously. He has these six-pack abs and stuffs. And he is a model too. Hit the jump for more downloadable posters of Panda for your viewing pleasure :P

So, Panda is a hunk now. No, seriously. He has these six-pack abs and stuffs. And he is a model too. Hit the jump for more downloadable posters of Panda for your viewing pleasure :P

Tuesday, January 5, 2010
Happy 2010
We have entered the year 2010! Note that it should no longer be called "two-thousand-and-ten". Its "twenty ten" people, just like how 1999 was "nineteen ninety-nine". Enough said.. Have a splendid new year. Here's a video review of Revenge of the Fallen Leader Class Buster Prime to start your new year :P
Subscribe to:
Posts (Atom)
